
All New, All Deadly X-Men:
Grey King
by Trip Somers
|
As I grow as a customizer more and more of my recipes are original rather than borrowings from other customizers. The Grey King is very original except for the fact that I used the ever popular Archangel III base.
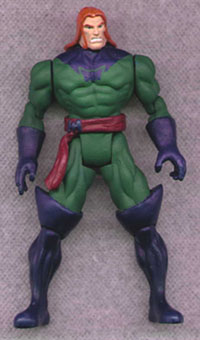 My recipe calls for the butchering of two fine figures: X-Men Battle Brigade Archangel and X-Men Savage Land Joseph. The first step is to remove the heads of each figure! Now attach the Jospeh head onto the Archangel body.
The next thing to do is to hide those wrist rings! You can do this with a layer or two of sculpey, which is good because those rings are very easily turned into Grey King's gloves. These are very easily messed up, so I recommend that you cure this part of the figure right away.
The next bit of sculpting is done just above the knees for the boot-tops. The clay needs to be tapered from the bottom up. Find a good reference picture that will show exactly the right angle and height for the boot-tops so that you'll be happy with it when you're done. Cure the clay and proceed to the next step.
Finally, the belt can now be sculpted. It is highly recommended that you find another action figure with this kind of sash/belt for you to compare your work to. Attempt to imitate that sash/belt as best you can so that it has a realistic look to it. The hardest part of the belt is the Phoenix symbol on the right hip. In order to properly work the shape into the clay, the clay should be put into a freezer for about 5 minutes or a refrigerator for about 10 minutes. Don't put your whole chunk of clay in, just the amount you need to make the emblem.
After the proper stiffening takes place you can successfully sculpt the Phoenix symbol working from the reference picture as usual. Once that is done, you can cure the entire figure. Be sure to use a method that is not harmful to the figures shape (ie. extreme heat can cause melting, warping, etc.).
Painting is the last step and the only trick here is trying to get the Phoenix emblem correct on his chest. I used a very thin brush, barely brushing over the outline of the symbol. Of course, I didn't get it right the first time either, but persistence is the key. Keep trying until you get it right!